Friday, November 2, 2012

Upholstered Modern Twin Bed (Regular)


Need twin beds? Build it with these easy steps (I built me two :-).


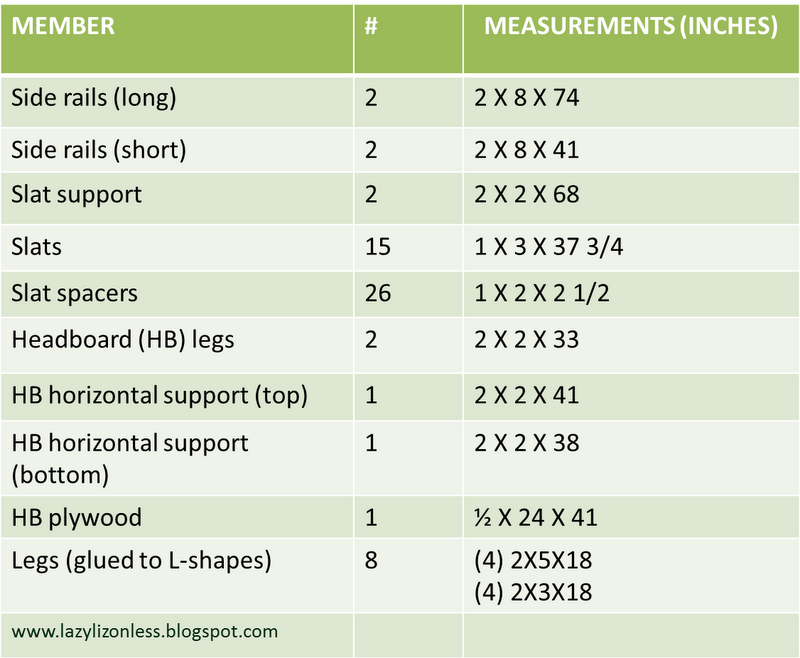
Here are my Parts Lists:


Materials:

Dowels
Foam (1 X 24 X 41")
Fabric (for upholstering headboard, 1 1/2 yrd)
Batting (1 1/2 yrd)
2 1/2" screws
1 1/2" screws
8 corner braces
4 flat braces
4 heavy duty corner brace (optional)
button maker
staple wires

Steps:

Attach dowels (pocket holes and screws can be used instead, if preferred).


 Attach the slat support 3" from the lower edge using glue and screws.
 Glue the spacers 2 1/2" apart.

Paint the parts.
  
Build the headboard.

 Mark and drill holes for the buttons.
 Attach the foam.
 
 Cover with batting.
Make buttons.
Upholster headboard and add the buttons.
  Attach the bed frame.


Turn it upside down and attach legs.

Attach the upholstered headboard.

Put the slats. Repaint scratches. Done!


Pin It

Thursday, August 16, 2012

Shoe bench and clothes rack


If you don't have mudroom, this simple shoe bench and clothes rack will do the job.


Here's how I built my shoe bench and clothes rack. I built it small to fit my space, you can build yours bigger.

Building the cloth rack:

-Cut the side part using jigsaw.
-Attach the lower shelf.
-Attach the top shelf.
-Attach back cover.
-Add shelf divider.

-Fill holes,sand and paint. Then attach the hooks and hanger.


Building the shoe bench:

-Attach the sides to the top part using pocket hole screws and glue.


-Then the middle shelf.


-Attach the bottom part.

-Attach the legs ( I used dowels and wood glue)


-Fill holes, sand and paint. Paint the door, attach to the bench and add handle.


-Done!
 I made the patterned back using furring strips, this is to prevent hanged things scratching the wall paint . It's only attach to the wall (using hangers) and not to the rack or bench.

Pin It

Friday, August 10, 2012

Space saver for bathroom

Need place to put toilet paper and magazines in your small bathroom? You can build one like this...

 
Here's how I built mine.

Make the shelf.


 Attach the back cover.
Fill holes, sand and paint.
Attach the legs.


Attach the cabinet door and knob. You can add moulding around the edge of the top and the bottom shelf to get the traditional style.
That's it!
 

Pin It

Wednesday, July 25, 2012

Simple Modern Shelf


There's an odd corner in our hallway and I have no idea what's it for (maybe it's intended for grandfather's clock) so I build a simple display shelf to fill the space.


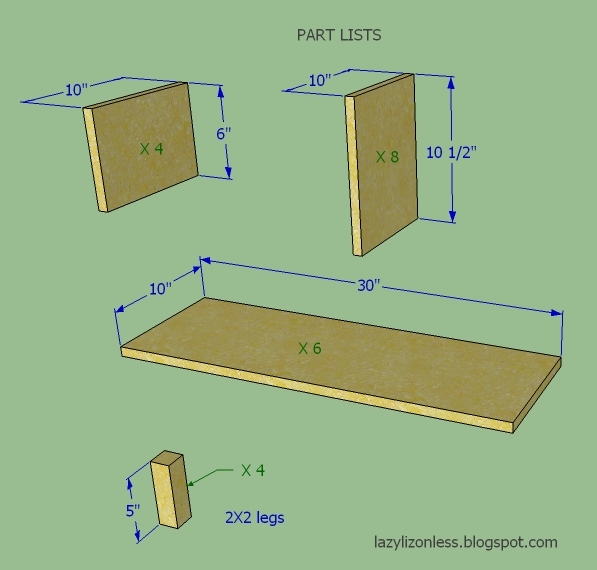
This shelf is very easy to build, anybody with circular saw and power drill can build it in no time. It don't even need step by step procedures :)

the 10" X 10 1/2" part should be 9 pcs. and not 8

I used pocket hole screws and wood glue to attach the members.


Make three of this.


I used 1/4" plywood for the back of the two connecting shelves. 


 I attached the legs using dowels and corner braces.


Fill the pocket holes, lets dry and sand. Paint.


Pin It