Showing posts with label Dining room challenge. Show all posts

Thursday, May 10, 2012

Ladder shelves

I just can't stop building stuffs for my dining room. Maybe after buying rug, I can say my dining room is finally complete....(maybe :)

I built these shelves as a bookcase and display shelves. My dining room can be dining/reading area.


The first shelf..

The second shelf ..


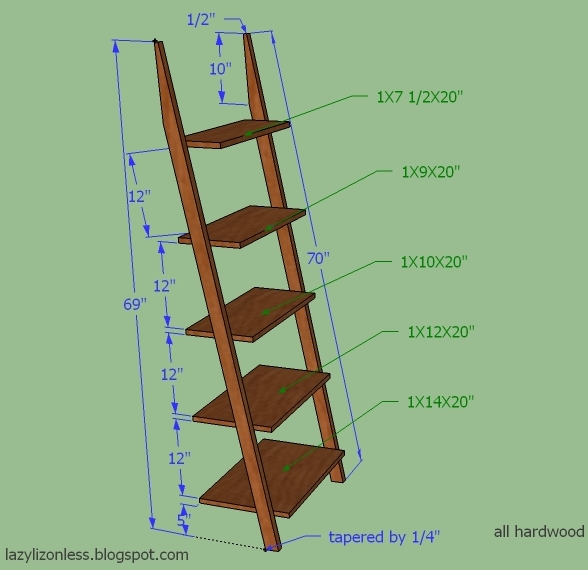
I made two 5-tier red oak ladder shelf.


I didn't took a lot of photos this time but the process was very easy.

How to make 5-tier ladder shelf

Taper one end of two 1 X 2 X 70" (ripped from 1X5X70 board) by cutting two shorter sides of a triangle 10" and 1 1/2".
 Cut five 20" long rectangles in decreasing sizes(14,12,10,9,7 1/2") for the shelves.
The trick: Use two 5" tall scraps board to support the first shelf (tier) as shown below, use glue and screw to attach to the legs.
 And two 12" scrap boards for the rest of the tiers, working your way to the top.

Final dimensions:

If you want to build using plywood or MDF, here's a very good plan to follow from AnnaWhite.com.
Pin It

Friday, May 4, 2012

Dining wall mirror decor

For the empty wall above my dining buffet, I made three small wall mirror.
The mirror made the room seem larger.

After building the chairs, making these mirrors was easy as pie :)

1. I measured and marked where to cut according to the mirror measurement.
 2. Cut, 45 degrees.

 3. Assemble frame using glue and corner brace.
 I made three.
 4. Draw the pattern.
5. Cut using jigsaw.
6. Paint and let dry.

 I bought a whole piece of mirror from Lowe's and asked them to cut it for me.

7. Frame the mirror, using straight moulding to close the back.

8. Using clear epoxy, glue the decorative pattern. Add hangers and hang.
I used the pattern I used on my hallway side table.
Oh and yes, I painted one side of my dining wall :)
Pin It

Friday, April 27, 2012

DIY Dining chairs - finally finished them!

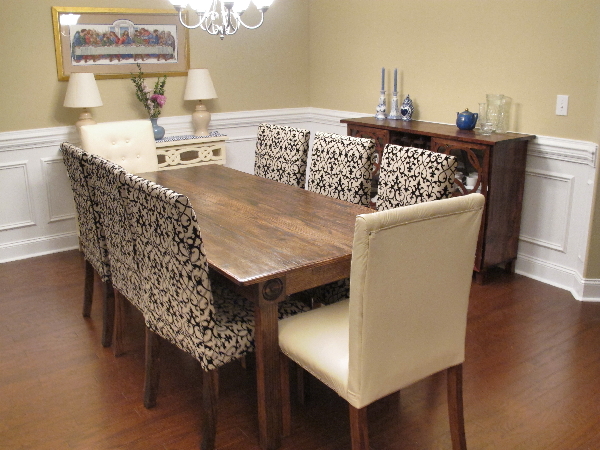
I can't believe I finished all the 8 chairs! I thought I will be buying my dining chairs. I am very happy and proud of myself for finishing every single project that I started for my dining room.


beautiful red oak table detail


See how I finished my chairs:

- Start by putting the webbing as shown.

-Add X webbing.

-Add more horizontally.
made two of this particular chair very strong for the king of the house :)

-Attach 1 inch foam (two inch for the seat)

-Then the batting.

Back view.

- For the seat cover corner, cut the corner as shown.

-Sew.

The clean corner look.

Do the same with the bigger chair.


- For the back cover, cut slits.

-Tuck the middle part in.

Back view.
 

- Staple.

- Fix the back corner by tucking the side and fold over the middle part to get this look.

detail of the large chair
-Use decorative tacks to attach the lower back of the cover.

 - And the front part for stronger hold.

Put the back cover using hidden metal tacks strip.


-Make the buttons for the large chair as directed on the package of the button maker.


- Mark where to put the buttons.

- Put buttons using nylon thread.

-Use scraps for the back to prevent the thread from going through.

It's that easy and you got your cute buttons!

- Put decorative tacks on the lower side if desired.

Finished side chair.

Finished large dining chair.


fabric detail


All together.

All the furniture on this room were built from trees damaged or felled by tornadoes near where we live
Now what should be my next project? :-) Pin It