It took me a while to decide which project to build next. I'm glad I did this chaise lounge to replace the overstuffed chair Uma has been using. It is very comfortable and no more crick in my neck from tilting my head to the side to watch tv.
I never had a chaise lounge ever before but I thought this would add not only furniture but also a decor and hidden storage for throws and what not.
| I use it to store extra throws, blanket and extra sewing fabrics. |
Cut lists:
(2) 26 X 7 X 3/4” back rest side parts, cut as shown below
(16) 22 ½ X 2 X 3/4”
back rest horizontal supports and box lower support
(2) 21 ½ X 8 ½ X ½” plywood, box shorter side cover
(4) 57 X 2 ½ X ¾” box
long side support
(6) 5 X 4 X ¾” box vertical long side support
(2) 24 X 3 X ¾” box horizontal short side support
(2) 59 1/4 X 9 3/4 X ½” plywood, box longer side cover
(1) 59 ½ X 21 ½ X ½” plywood, box bottom cover
(2) 57 3/4 X 1 1/2 X 1”
seat part long side support (I used red oak)
(4) 21 X 1 1/2 X 1” seat part short support
(1) 57 ¾ X 23 ½ plywood
(if using plywood for the seat support cover instead of S-spring or webbing)
(1) any size for arm support(8) 4 X 3 X 3/4" legs, tapered or (4) store bought legs
Material lists:
6 yards patterned fabric
2 yards non patterned basic fabric ( for bottom and inside seat box cover)
1 1/2 pcs. 24 X 72 X 3or4 in. good quality foam
glue/spray glue
staple wire
4 box furniture tacks
paint
2 hinges
pocket hole screws
corner braces
mending plates
S-spring or no sag spring or webbing
batting
disclaimer: plans and parts are an estimate and your requirements may vary
Make the curved backrest piece. I wrote the measurement on the wood, click to enlarge if not clear. I freehand drew the curve side but made sure to maintain the 3 " width except for the round part with radius of 2".
Jigsaw cut the board.
Use the piece and trace to make a pair but make sure to cut this one inside the line.
Cut the parts needed to make the box frame (from Cut list)
Make the backrest.
Start making the storage box frame by building the two longer sides.
Attach the bottom frame part.
..and one side
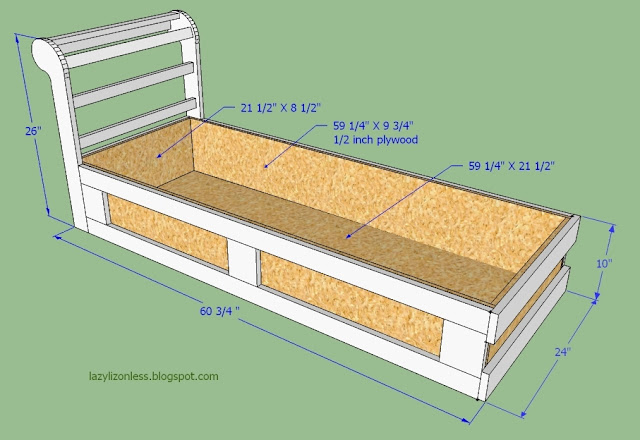
Cut and attach plywood pieces to complete the box (almost complete box). Scroll down to the frame dimensions to see the plywood measurements.
| plywood is 3/4", 1/2" is okay |
Use mending braces (size also on the plastic) to attach the backrest frame on the box.
| Use higher grade plywood if desired |
| Notice I added a middle support. |
I'll slowly work on completing the plan but for now here's the frame dimensions.
Make the side/arm rest (can make it longer if desired). For sturdier arm rest, wood glue two 3/4" plywood or buy the thickest plywood.
| again, I hand drew this part, can design in anyway you like |
Start making the storage cover frame (seat part). I used red oak (very strong wood) so I don't need to use a thicker and wider board.
Use corner brace and glue to attach the corners. Every wood to wood joint should ALWAYS use glue.
| if using screws and glue, add piece of wood corner brace to prevent wiggling |
I used left over nylon webbing from my dining chairs. I recommend no sag S spring or plywood. If using plywood, use 3 or 4" foam. Chaise is for me so I know using the left over nylon webbing is okay and can hold my weight.
Laying down the middle support gives clearance for the webbing.
| can make the webbing tighter/denser for stronger seat |
Glue the foam. If I had burlap on hand I would cover the frame first before attaching the foam.
Add the batting using adhesive glue and staple the sides.
And the fabric, make sure the pattern of fabric are proportionately laid out.
Add the foam on the backrest and the batting
Cover the backrest and short front side of the box with fabric keeping in mind the pattern lay out.
Backrest detail.
Cover the front long side of the box. Keep in mind to match the pattern of the seat and the storage box.
Attach the hinges. Poke holes on fabric to screw on first so it won't pull the fabric when driving the screws in.
Lay box on one side and attach the seat part.
Glue one inch foam and batting then upholster the side part or arm rest. Then upholster the rest of the side and the bottom using non patterned fabric.
Add optional decorative tacks.
| pattern of top and bottom should be carefully aligned and not staggered |
| see the hinge? |
| backrest side detail |
| back detail |
And finally, attach the clear coated legs then you got your comfortable piece of furniture that will last.
| very comfortable lounging chair :) (run out of decorative tacks to go all around the front) |


